Mason Jar Decor DIY
Happy D.I. Weilerts Wednesday!! Today, we are going to create a cute home decor item for under $5! This is a DIY on a budget and a Macklyn Original!! I'm super proud of this piece and can't wait to share how to make!
For today's DIY, you will need:
- Dollar Tree Wood Decor item (I found this mason jar at Dollar Tree during Christmas season, but you can do this with any small wood the shape will just be different.)
- Scrapbook paper (I got the buffalo plaid one at Michael's. But you can also do wood, black and white check, shiplap, and etc.)
- Twine
- Ribbon
- Small bell
- Something to go in the middle. If you have a Cricut, you can cut out a design. Or I found this cute magnet on sale at Hobby Lobby after Christmas.
- Mod Podge
- Hot Glue
The reason why this DIY came out under $5 for me is because I already had about half the stuff from previous projects. A habit I have been getting into recently is just picking up things here and there while they are on sale and then trying to incorporate them in a DIY. Right now, I have a bin of winter craft supply that I keep in my work area. That way when I'm wanting to add something to a project I am working on I can just already have it on hand and add it.
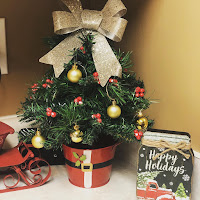
Step 1: Remove any extra stuff that might be on the item. We used a mason jar as seen in the photo below. It was decorated and had twine on it. We removed the twine and Josh sanded it down for me. (I hate the sound of sanding. It's like nails on a chalkboard for me!)
 |
| The Dollar Tree Mason Jar I used is in the bottom right corner. (I also made this Christmas tree from Dollar Tree items) We will do a blog post on how to do that closer to Christmas. |
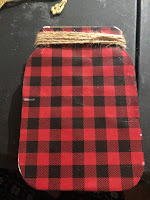
Step 2: Cut out the scrapbook paper. I traced the shape of the mason jar and then cut it out. Then mod podge the paper onto the wood. Add a coat of mod podge on top of the paper also.
PRO TIP: I just learned this yesterday and I am so excited to share this but to help with the air bubbles in the paper, just add some water to the mod podge. Use that mixture to mod podge the paper and that should help eliminate the air bubbles and wrinkles.
Step 3: Add hot glue to the top and wrap the twine around the jar where you had the hot glue.
Step 4: Add a bow and a bell for a nice finishing touch. This also covered up where I started and ended wrapping the twine around the jar.
Step 5: I felt like the middle needed something more, so I hot glued a magnet I had bought to the center of the mason jar. Like I said in the materials section, you can also create a design on your Cricut and mod podge it onto the piece or use another small decoration or item and add it to the middle.
Once you're done, add it to your home decor and enjoy! I love it in our kitchen!


Comments
Post a Comment